Sunday, December 4, 2016


Creating Global Communicators

Our world is becoming increasing connected with the many opportunities and resources provided by the internet and now a rapidly increasing amount of educational apps. Students across the globe now have the chance to meet other students from around the world. Virtual field trips, speaking with experts, connecting with classes in other countries are just a few of the ways that we are more connected. The best app for providing these opportunities is Skype. Below are links to several websites with resources for Skype. Then, I will explain the app itself. Since I teach first grade, I will focus on the elementary classroom.


This list provides a general overview of ideas of what to do with Skype in an elementary classroom. It's a great way to get started.


This list features authors of picture books, appropriate for elementary age, and who are excited to Skype with students. This is a wonderful way for reading to come to life, and to engage young students in the writing process, as well.


This list includes everything from national parks to museums. This would be most beneficial for Social Studies lessons.


This list explains the numerous locations for a virtual field trip. Many of these include historical sites, museums, zoos/aquariums, national parks, or even speaking with survivors of historic events.


This list details experts, in a variety of fields and from around the world, who would enjoy taking the time out of their day to Skype with students. This section features quite a few scientists.


Playing "Mystery Skype" adds some excitement and a dimension of the unknown to the Skype experience. This list names classrooms that are willing to play Mystery Skype. When playing, you will not know which classroom you will be connecting with.


This link provides information on how to get started, for teachers that may be interested in checking out the opportunities that Skype provides. This would be a great place to start for a teacher learning how to use Skype in their classroom.


Once you've decided that Skype really does sound like an awesome addition to your classroom, you can begin by joining the community. This makes it easy to connect with the resources and people listed above.

Begin by creating a login, through one of the apps listed above or filling in the form below.


Next, complete the registration. One of the most important parts is selecting the time zone that you are in. This is one of the really cool features about Skype in the Classroom. On the description of every person or organization, it states what time zone they are in, so that you can plan the timing accordingly.


One you've registered, you'll be given a profile, which allows you to connect with the other people and organizations. It shares who you've Skyped with, different locations of the people you've Skyped with, and keeps track of your interests and all you've done.


Then, you need to make sure you have a Skype account and have downloaded the Skype application onto whatever machine you choose to use. When you've downloaded the app, created a login, and have made plans to Skype with someone, you can simply search for them on the app and their information will appear. Next, simply add them as a contact.

Once they're added as a contact, you are able to connect. In order to connect, you can either press the phone button to call or the video camera to video chat, and you're ready to go!


Thursday, December 1, 2016

Discovering Boardmaker & Half-Past Time


So, Boardmaker, it's an app. I have to be honest, I wasn't sure what to expect. But, hey, it's technology for teaching, so I'll check it out. I quickly discovered it's pretty pricey, and without purchasing it there's not too much you can do. It seems that when you do purchase it, you can create online games, activities, and have a variety of assessments/games/activities already created and ready to go. It also seems most geared towards the younger (think elementary, early childhood) ages. Since I did not purchase it, I became creative with what I could use. I did discover that I could create games, using their template. I suppose this was a step-up from Microsoft Word, in that I didn't have to create a table, and when I searched for times, they had easy-to-read pictures that I could quickly put in the game board. It was pretty easy to create, and I didn't have to draw on the board (as I have in the past when using Word.) However, I wish they had taken it a step further, and had an option to randomize the boards, so that I could have more than one board to pass out. Again, similar to Word, I had to copy and paste varying squares. So, I think if they had taken it a step further, I could've seen more of a benefit.

However, I still tried it out and I'll share what I learned!

In order to begin making the game I went to the "My Boardmaker" section and selected "Create Activity."


At that point, I had numerous options to choose from for game formats or activity types. So, I personally selected a Bingo board.


At this point, I was able to design my game board. I knew I wanted a game reviewing half-past and o'clock time. So, I searched digital times (6:00) and an analog clock came up. Our mathematics curriculum uses the phrases "half-past" and "o'clock." So, I edited the text below the clocks to align with this similar language. Again, this isn't too different from Microsoft Word, but it was nice to have the captions and clear clock pictures (rather than searching through Google images.)


Finally, Boardmaker didn't make it sure easy to print this, with the same formatting. But, with your login to Boardmaker, you can see it again later, and easily share it with other people.


So, honestly, I'm not inclined to use it again, but it was a good experience to learn about it.


Friday, November 11, 2016

Assistive Technology

One of the greatest challenges of a teacher is providing supports for individual children, based on their varying needs. However, it can also be one of the greatest joys, as you see children grow and succeed in areas that used to be challenging. One area where students often need support (in first grade particularly) is fine motor, which can often lead to challenges in math. In first grade math, we use a variety of manipulatives and visuals, as concrete representatives for children. These manipulatives and visuals are a great way to increase student understanding, but can be a challenge for students with fine motor struggles.

The number grid is the visual that we use most often during math time. We use it to increase number sense, for place value, to solve number stories, skip counting (preparing for multiplication), and much more. Over the last 2 years I've had several children struggle to use the number grid. I've printed off larger versions, which helped a little. But, they still often skipped lines or numbers. I've had them use the classroom number grid, but it involves flipping small cards, which is another fine motor challenge. So, I went looking for an app that might help with this. The app I will be featuring below is simply called "Learning Numbers Grid."

The feature that makes this app so fantastic, is that when students tap the numbers, they change color. This lets students know exactly which numbers they've tapped. This is huge! The changing colors prevents students from skipping numbers, hitting numbers more than once, or skipping a line. It also allows me (as a teacher) to tell them which numbers to hop between, and they can use this color-changing feature to discover patterns in the number grid.  


Another helpful aspect of this app, is the fact that you can customize how many numbers you want shown. 1-100 can be intimated or overwhelming for some students, so being able to only show numbers 1-50 or even 1-30 is quite helpful. Another fun element, is the ability to change the color of the numbers once they're tapped. This doesn't really have any huge learning benefit, but it's a simple way to making math more engaging for students. So, I'll take it!


 The picture below shows how the app looks when a specified range is selected. Here is selected the numbers 1-50. I'm excited to try out this app this week!


Time Troubles


One of my greatest challenges each day is Literacy Centers. During this time, we have 3 centers in our room, 2 of which are teacher-led and 1 which is independent. My greatest struggle is making the independent center a productive learning time, fun and engaging for the students involved, and totally independent (so that I can actually work with my own teacher-led center.) This has been quite the challenge with first grade kiddos. I've noticed that even when the centers are engaging and fun, students tend to not manage their time well, and I am consistently having to remind them to stay on task, give them reminders of how much time is left, and to explain if they don't finish now they'll have to finish at Quiet Time (never fun because it's their only true "free time" in the day.) So, I went looking for a way to help them manage their time. I used to have a Time Timer in my classroom, but it kept blowing through batteries and then broke. It's also super expensive to replace. So, I wondered if there was a simpler alternative. I found this app simply called "Classroom Timer," and it seems to be the perfect solution! I've been playing around with it and I'm excited to try it on Monday! I'll explain it more in details, using the pictures below.

One of the benefits is that the timer can be set for up to a hour, or even a few seconds. Students (even first graders) can even set it themselves. Once you've picked the amount of time you want, you simply press the play button (bottom left.)


Then, once the timer is set, it provides a visual of how much time is left. I don't know about you, but when I tell my kids "half" their time is gone, or they have 5 or 10 minutes left, this doesn't really mean much. Their brains have a hard time understanding amounts of time, so this red visual of time elapsed and what's left is actually super helpful!


Once their time is up, the timer is blank and begins to shake. It also sounds an alarm. The alarm is as loud as the volume setting on the iPad, and can even be silent if the iPad is on mute.


After the timer shakes and alarm goes off, this screen appears. It's a little dramatic, but an engaging way of letting students know that their time is up!


On the off (crazy beautiful) chance your students finish early, you can stop the timer and this screen will appear, congratulating them on their efficient work, and use of time! (As a said note, it is also possible to pause the timer (thinking fire drills, etc.) and recent, which is another benefit of this app, rather than a physical timer.)


Finally, I have been describing the free version, because I'm a cheap teacher and I want to test this out for a week before I invest (I realize it's not that expensive, but oh I could spend so much money on apps!) But, if you feel inclined to buy the full version, go for it! It only costs $1.99 and allows you to change the background, show time passed and remaining (numerically), and doesn't have any annoying pop-up adds. If I discover this app does work well for my students and is a helpful support, I will definitely make this purchase!


Saturday, November 5, 2016

Using Technology to Make My Life as a Teacher Easier!


Last year our literacy focus was on read-alouds. So, we made it our goal to do a read-aloud every, single day. We picked stories, thought of our goals, and focused on teaching one comprehension skill per month. We made them engaging, exciting, and had students sharing their knowledge like crazy! These times became sweet and a "looked forward to" part of our day. But, we realized we wanted a way to record all of the wonderful things are students were sharing. We started with paper, and that just wasn't working. We had a large file of notes and rubrics that were a nightmare to organize and keep up with. Also, jotting notes just isn't fast and by the time one student would share, I would miss the next 3 comments. So, I went looking for an app where I could record information, and give "points" to certain topics for each child. I ended up discovering ClassDojo. This app allows us to track the skills that each child is demonstrating during our Read-Aloud time, and make notes on things to work on or any areas they may shine. So, I plan to explain the parts of the app I use, how I use it, and other features that I don't currently use, but are available.
*As a disclaimer, I am in a 2 teacher classroom, so 1 teacher is reading and interacting with the students, while the other is taking notes (and also interacting periodically as well, and dealing with any issues like nose bleeds, lost teeth, student conflict, etc.) Just so you know our classroom structure. :)


Before you start, you need to add in each child in your class. This part is pretty basic, and this is what the class list looks like.


For my purposes, I was focused on the "skills" portion. One of the best parts of ClassDojo, is that you can add skills. So, I've added "Monitoring Comprehension," "Using Background Knowledge," and "Making Connections," since these are the comprehension skills we are currently focusing on. I will add more skills as the year progresses. Once these are added to the class skills, you can award points to each child.


Another fabulous feature is that you can add a "note," once you give a child a point in a specific category. This is where I say why I gave them the point. For example, I might write "Text-to-text connection with The Great Kapok Tree" after awarding Daniel a point for connections. To award a point, you simply click on the child, and click on the category.


Each child also has an individual report. This details all of the points they've been given, and the notes that have been taken. This is a great way to reflect on their individual growth. To be honest, I wish the categories were shown in a table format, but being able to see them all overall is very helpful. You can also select the amount of time you want to focus on.


Starting here are the features that I don't use on a daily basis, but are still really great! ClassDojo allows you to share each child's story with their parents, developing that partnership.


There is also a feature that allows you to create a "class story." Either the teacher, or the students can take pictures and videos during the day and share them with parents. When it is on "student mode" students can take pictures and video without accessing the rest of the app. It requires the teacher's password to get out of student mode, which is pretty helpful. Also, student shares are pending for permission by the teacher. It's a great way to get the kids involved and sharing their learning, in a manner that still has teacher control, and limits what they view on the app, so that the teacher can keep scores private.


A final feature, is that you can actually put students into groups, and award points to each group. This could be helpful with desk group points (you can determine whether you want students to see these scores or not.) This can be used with games, determining which desk groups are "working" or not, or a variety of other uses. It's definitely unique and has potential to be helpful!


Overall, ClassDojo has helped me organize information on students, in a manner that is easy, efficient, and thorough.


Students as Researchers

Today's post is all about having students learn the basics of research. Since I teach in a first grade classroom, one of the biggest challenge of students researching online is the fact that many of my students have limited reading and writing ability, and don't even get me started on typing and navigating with a mouse! Thankfully, we have a class iPad, allowing the students access to a touchscreen computer. We wanted for our students to complete a nonfiction writing piece, that included finding the information themselves. Since we have an "Animals and Habitats" reading unit that the students already love, we thought animals would be the perfect topic!

Our main goals for students, during this "research process" are for them to go through the process of finding the information themselves, take notes and turn these phrases into sentences, and understand the basic concept of plagiarism (why they can't copy word for word from a book or online.)

After trying a variety of apps, websites, and even creating a custom google search, our first grade team decided to use PebbleGo. We think this is a wonderful way for early childhood students to begin learning about research and is extremely first grade friendly!

Below are several pictures that feature the benefits of PebbleGo. The biggest downside is that it isn't free. But, once we presented a case for why we felt it would be extremely helpful for our students, our school purchased it. Check it out!

Here is the screen my students see when they first access PebbleGo. We purchased Animals and Science, since those are the topics that the students will be researching in Grade 1.


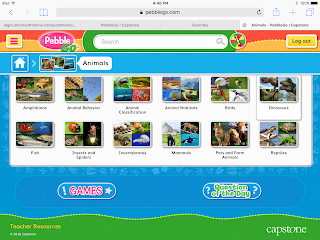
This screen shows the many choices students have under the "Animals" section. We've honestly never had a child whose animal (they chose) wasn't available on PebbleGo. It even features habits and animal habits. One of the best parts, is that my students can easily navigate the whole process themselves with our iPad!

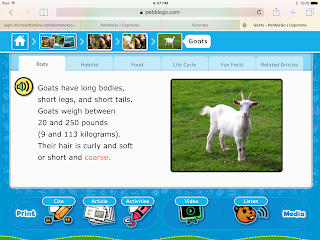
Once a student finds their animal, they come to a screen that looks similar to this. Each animal has pages that discuss their body, habitat, food, life cycle, and "fun facts" in kid-friendly language. There are also related pages that kids can check out if they are particularly fascinated by a topic.


We want for our students to understand why it is important to cite where they find their information, and begin this habit early on. Another nice feature is that when they click on the "Cite" button a pop-up gives them a citation, which they can either copy onto paper themselves or print off to attach to their report.


If it was beneficial for a student to see the information in a printed version, this is an option as well!


Nearly every animal page includes a video of the animal, allowing the child to see them "in action." This is a great way for a student's topic to come to life! Several of my "city kids" have not seen too many animals, besides maybe a few zoos and television. So, these videos are very engaging to them!


One downside of the videos it the fact that they don't have sound. But, there is also a "Listen" button, where students can listen to the sound their animal makes. Again, this is a way to make learning engaging and exciting for young children, or really people of any age!

Another cool feature, is the "Locate" button, which helps students understand where in the world these animals live. This is always a great connection to our Geography unit, which we just finished.


As a way of extending the learning, there is also an "Activities" section under many of the animals. A teacher could print off this notes page for students to record their research, or there is even a labeling sheet.


 PebbleGo also has Games for students to engage in that are focused on the topic they are researching, in this case animals. We've allowed our students to play these games during Exploration Centers, encouraging them to engage with learning about animals in a different way.


One final feature, is that there is a Question of the Day. This doesn't really affect a student's learning about animals, but it is a way for them to engage in the world around them, and they always love sharing their opinion, of course. :)


Saturday, October 29, 2016

Image result for pennies and nickels

We've been learning about counting coins in math. We began by counting pennies, then nickels, and finally combinations of both coins. Below is a sample student tutorial video on how to count these coins, using a few of the strategies we have been practicing during math time. This video was made with the app "Explain Everything." Enjoy!